How To Make Sourdough Bread Without Dutch Oven Recipe
This easy sourdough bread recipe without a Dutch oven delivers bakery-quality results using simple loaf pans. The secret lies in creating a steamy environment with a water bath for that perfect crispy crust and airy crumb. Perfect for both beginners and experienced bakers looking to simplify their sourdough journey!

I love making sourdough bread at home, and there are so many ways to achieve a beautiful loaf! This simple sourdough recipe proves that you can achieve amazing results using just loaf pans and basic kitchen tools with minimal effort.
What I love most about this method is how it removes barriers for new bakers while still delivering that perfect combination of crispy crust and soft, airy interior. Plus, shaping it into loaf pans makes this perfect for everyday sandwiches and toast! If you enjoy this recipe, you might also love my Easy Overnight Bread or Sourdough Discard Cinnamon Rolls.
For many home bakers, the Dutch oven has become somewhat of a requirement for making delicious sourdough bread. But the truth is, people have been making incredible sourdough long before Dutch ovens became popular in home kitchens.
This recipe returns to simpler methods, proving that the best way to make sourdough doesn’t necessarily require expensive equipment. The loaf pan technique actually offers greater versatility for everyday use while maintaining that artisan quality we all crave.
Experienced sourdough bakers will appreciate the streamlined approach, while beginners will find it less overwhelming than traditional methods. The steam bath creates the perfect environment for your dough to rise beautifully and develop that characteristic crust—proving that with a few simple tricks, you can create bakery-worthy bread right in your standard home oven.

Why You’ll Love This Recipe
- No special equipment is required. You can make gorgeous artisan-style sourdough bread using just regular loaf pans instead of expensive Dutch ovens or specialty bakeware.
- Versatile shape for everyday use. The loaf pan format makes this bread perfect for sandwiches, toast, and general everyday eating compared to round boules.
- The foolproof steam method ensures success. Creating a steamy environment with a water bath is the secret to achieving that coveted crispy crust without specialized equipment.
- Flexible timing works with your schedule. The long bulk fermentation can happen overnight while you sleep, making this recipe adaptable to busy lifestyles.
What Is Sourdough Bread Without a Dutch Oven?
Sourdough bread without a Dutch oven is simply artisan-style sourdough bread baked in standard loaf pans using a steam method to create the perfect crust. Traditional sourdough recipes often call for Dutch ovens because they trap steam during the initial baking phase, which is crucial for developing that signature crackly crust and helping the bread rise properly.
Working with bread dough can seem intimidating at first, but this method simplifies the process while teaching you valuable techniques like proper stretching, folding, and creating surface tension.
This recipe achieves the same results by placing a pan of water beneath the loaf pans, creating a steamy environment in your home oven. The result is beautiful homemade sourdough bread with soft crumb and crispy golden crust—without investing in expensive equipment. The loaf shape also makes it more practical for everyday uses like sandwiches and toast, while still maintaining all the flavor and health benefits of traditional sourdough.


Sourdough Bread Ingredients
- Active sourdough starter: Make sure your starter is bubbly and active before beginning this recipe. I prefer to use a stiff, dry sourdough starter for best results.
- Warm water: Room temperature or slightly warm water works best to activate the natural yeasts in your sourdough starter.
- Bread flour: This higher-protein flour creates better structure and chewiness in your loaf. I like to buy pantry staples like organic flour from Azure Standard or Thrive Market because of their great prices.
- Salt: Don’t skip this crucial ingredient—it not only adds flavor but also helps control fermentation.
A full list of ingredients and quantities can be found in the recipe card below.
Tools You May Need
- Kitchen scale: For accurate measurements, a digital scale is highly recommended when baking sourdough.
- Loaf pans: Standard 9×5 inch loaf pans work perfectly for this recipe.
- Parchment paper: Creates a sling for easy removal of bread and prevents sticking.
- Oven-safe dish: For holding water to create steam during baking.
- Bread lame or sharp knife: For scoring the top of your loaf before baking.
- Spray bottle: Optional for misting the oven with water for additional steam.

How To Make Sourdough Bread Without a Dutch Oven
Learning how to make sourdough bread without a Dutch oven is simpler than you might think. This method uses regular loaf pans and a steam bath to create the perfect environment for beautiful, crusty bread with a soft interior. By following these step-by-step instructions, you’ll discover that baking exceptional sourdough doesn’t require any special equipment—just good technique and a little patience.
Make the Dough
- Whisk together the active starter and warm water in a large bowl, weighing each ingredient as you go.
- Add in the bread flour and salt, and mix again to form a rough dough. The goal at this point is to have all of the flour mixed into the dough.
- Cover with a damp tea towel and let rest for about 30 minutes. Feed your starter during this time and clean up. After about 30 minutes, you’ll perform four sets of ‘stretch and folds’ over two hours, every 30 minutes.
Stretch and Folds
- With wet hands, gently fold the dough onto itself. To do this, think of dividing the bowl into fourths. Grab one piece of the dough on the right, then pull it up and fold it back into the middle of the dough. Turn the bowl a quarter and repeat. Do this all the way around the bowl twice. This is your ‘stretch and fold’ that you will continue over the next hours and a half.
- Cover the dough with a wet tea towel, and allow the dough to rest for 30 minutes. Then, repeat the stretching process described above.
- After the stretch and folds, allow the dough to rest, covered, for another 30 minutes. Then repeat the stretching process again.
- After the stretch and folds, allow the dough to rest, covered, for another 30 minutes. Then repeat the stretching process again.
Bulk Fermentation (Bulk Rise)
- After the final stretch, place a wet tea towel and either plastic wrap, a large plate, or a heavy lid on top of the dough. This will help prevent the dough from drying out.
- Allow the dough to rise at room temperature for about 8 hours. If it is very warm in the room, consider transferring the dough to the refrigerator for 12 hours.
Shaping the Dough
- In the morning, turn the dough out onto a lightly floured work surface to shape. (Note: if your dough has risen in the refrigerator, allow the dough to sit at room temperature for about 15 minutes before shaping).
- To shape your dough, gently stretch it into a long rectangle. Then fold a short side into the middle, then the other to make a long, fat rectangle. Then gently roll the short end of the rectangle in onto itself to form an oblong, rounded log.
- Shape the dough into an oblong round that will fit your loaf pan rather than a circular boule.
Building Tension
- Now, you’re going to build tension in the dough. Cup your hands around the dough and gently slide it back and forth along the counter, keeping the same part of the dough on top. (Meaning, don’t actually turn it over, just slide it across the counter.)
- Lightly flour a lined banneton, colander, or mixing bowl and transfer the dough into it with the top of the dough facing downward towards the bottom of the banneton/bowl.
- Cover with a dry towel and place in the freezer for 10 minutes or so while the oven preheats.
Bake the Dough
- Preheat the oven to 450°F.
- Take the dough from the freezer and turn it out onto a piece of parchment paper or a bread sling. Using the tip of a bread lame, small knife, or a razor blade, make four shallow 4-inch long cuts at 3, 6, 9, and 12 o’clock around the surface of the loaf dough.
- Transfer the parchment/sling to the loaf pan.
- Place an oven-safe vessel filled with water (it can be cold or hot water) on the rack underneath the loaf pan.
- Bake the dough on the middle rack for 20 minutes with the water vessel creating steam.
- After 20 minutes, remove the water vessel, reduce the oven temperature to 425°F, and continue to bake for another 15-20 minutes until the bread is golden brown.
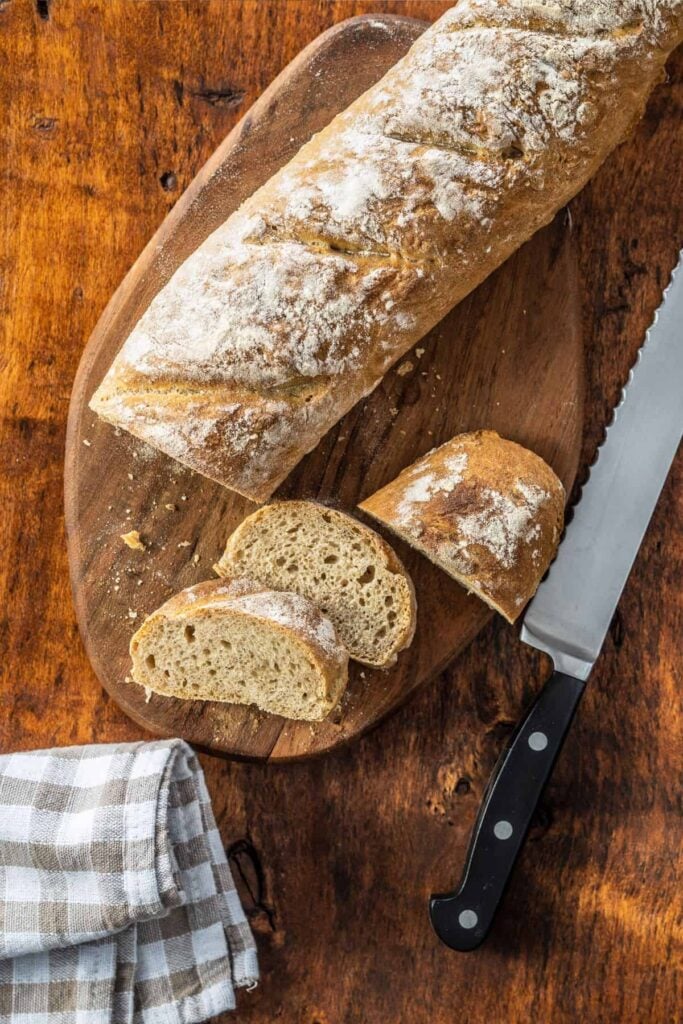
- When the loaf of bread is cooked through and golden brown with a beautiful crust, transfer it to a wire cooling rack. Cool for 1 hour before slicing for the best texture.


Recipe Tips
- Use the poke test to check if your bulk fermentation is complete. Gently poke the dough with a floured finger—if it springs back slowly and leaves a slight indentation, it’s ready.
- Cold fermentation in the refrigerator develops more flavor. If you have time, let your dough bulk ferment in the refrigerator overnight for enhanced taste and easier handling.
- Don’t skip the scoring step! Scoring allows the bread to expand properly during baking and creates those beautiful patterns on your finished loaf.
- If you don’t have bread flour, you can use all-purpose flour and mix in 1 Tablespoon of vital wheat gluten for every 1 cup of all-purpose flour for better structure.
- Allow your bread to cool completely before slicing. This may be the hardest part, but cutting into warm bread can make it gummy.
- Storage: For the first day, store your bread cut-side down on a cutting board. After that, wrap it in a clean kitchen towel or store it in a paper bag. Avoid plastic bags unless you plan to toast the bread, as they soften the crust.
Sourdough Bread Without Dutch Oven Variations
- Sandwich bread loaf: For a softer crust perfect for sandwiches, brush the top with melted butter after baking and cover with a kitchen towel while cooling.
- Mix-in additions: Fold in herbs, chopped olives, roasted garlic, or a handful of seeds during your final stretch and fold for flavored bread.
- Whole wheat blend: Replace up to 20% of the bread flour with whole wheat flour for a nuttier flavor and additional nutrients.
- Seeded crust: After transferring to the loaf pan, spray the top lightly with water and sprinkle with sesame, poppy, or other seeds before baking.
Recipe FAQs
I hope you enjoy this recipe & learn to love baking sourdough!

Sourdough Bread without a Dutch Oven
This artisan sourdough bread baked in loaf pans delivers a perfect crispy crust and soft interior without requiring a Dutch oven or special equipment.
Ingredients
- 50 grams active sourdough starter
- 350 grams warm water
- 500 grams bread flour (see note)
- 10 grams salt
Instructions
Make the Dough
- Whisk together the active starter and warm water in a large bowl, weighing each ingredient as you go.
- Add in the bread flour and salt, and mix again to form a rough dough. The goal at this point is to have all of the flour mixed into the dough.
- Cover with a damp tea towel and let rest for about 30 minutes. Feed your starter during this time and clean up. After about 30 minutes, you'll perform four sets of 'stretch and folds' over two hours, every 30 minutes.
Stretch and Folds
- With wet hands, gently fold the dough onto itself. To do this, think of dividing the bowl into fourths. Grab one piece of the dough on the right, then pull it up and fold it back into the middle of the dough. Turn the bowl a quarter and repeat. Do this all the way around the bowl twice. This is your 'stretch and fold' that you will continue over the next hours and a half.
- Cover the dough with a wet tea towel, and allow the dough to rest for 30 minutes. Then, repeat the stretching process described above.
- After the stretch and folds, allow the dough to rest, covered, for another 30 minutes. Then repeat the stretching process again.
- After the stretch and folds, allow the dough to rest, covered, for another 30 minutes. Then repeat the stretching process again.
Bulk Fermentation (Bulk Rise)
- After the final stretch, place a wet tea towel and either plastic wrap, a large plate, or a heavy lid on top of the dough. This will help prevent the dough from drying out.
- Allow the dough to rise at room temperature for about 8 hours. If it is very warm in the room, consider transferring the dough to the refrigerator for 12 hours.
Shaping the Dough
- In the morning, turn the dough out onto a lightly floured work surface to shape. (Note: if your dough has risen in the refrigerator, allow the dough to sit at room temperature for about 15 minutes before shaping).
- To shape your dough, gently stretch it into a long rectangle. Then fold a short side into the middle, then the other to make a long, fat rectangle. Then gently roll the short end of the rectangle in onto itself to form an oblong, rounded log.
- Shape the dough into an oblong round that will fit your loaf pan rather than a circular boule.
Building Tension
- Now, you're going to build tension in the dough. Cup your hands around the dough and gently slide it back and forth along the counter, keeping the same part of the dough on top. (Meaning, don't actually turn it over, just slide it across the counter.)
- Lightly flour a lined banneton, colander, or mixing bowl and transfer the dough into it with the top of the dough facing downward towards the bottom of the banneton/bowl.
- Cover with a dry towel and place in the freezer for 10 minutes or so while the oven preheats.
Bake the Dough
- Preheat the oven to 450°F.
- Take the dough from the freezer and turn it out onto a piece of parchment paper or a bread sling. Using the tip of a bread lame, small knife, or a razor blade, make four shallow 4-inch long cuts at 3, 6, 9, and 12 o'clock around the surface of the loaf dough.
- Transfer the parchment/sling to the loaf pan.
- Place an oven-safe vessel filled with water (it can be cold or hot water) on the rack underneath the loaf pan.
- Bake the dough on the middle rack for 20 minutes with the water vessel creating steam.
- After 20 minutes, remove the water vessel, reduce the oven temperature to 425°F, and continue to bake for another 15-20 minutes until the bread is golden brown.
- When the loaf of bread is cooked through and golden brown with a beautiful crust, transfer it to a wire cooling rack. Cool for 1 hour before slicing for the best texture.
Notes
- For a softer crust perfect for sandwiches, brush the top with melted butter after baking and cover with a kitchen towel while cooling.
- Fold in herbs, chopped olives, roasted garlic, or a handful of seeds during your final stretch and fold for flavored bread.
- Replace up to 20% of the bread flour with whole wheat flour for a nuttier flavor and additional nutrients.
- After transferring to the loaf pan, spray the top lightly with water and sprinkle with sesame, poppy, or other seeds before baking.
Recommended Products
As an Amazon Associate and member of other affiliate programs, I earn from qualifying purchases.